Thursday 19 December 2013

Grey distressed armoire

When I redo furniture its always cool and happy because I'm doing mostly things that I have a vision of how they are going to turn out. Then I sell them and all is good.

However, when someone asks me to redo a bit of their furniture in a certain style - I panic. What if they don't like it? What if after spending hours (sometime days) I have to do it all over - i'll end up upsetting someone (and believe it or not I really don't like doing that!)

This next project had me filled with dread because it had to be quite specific!

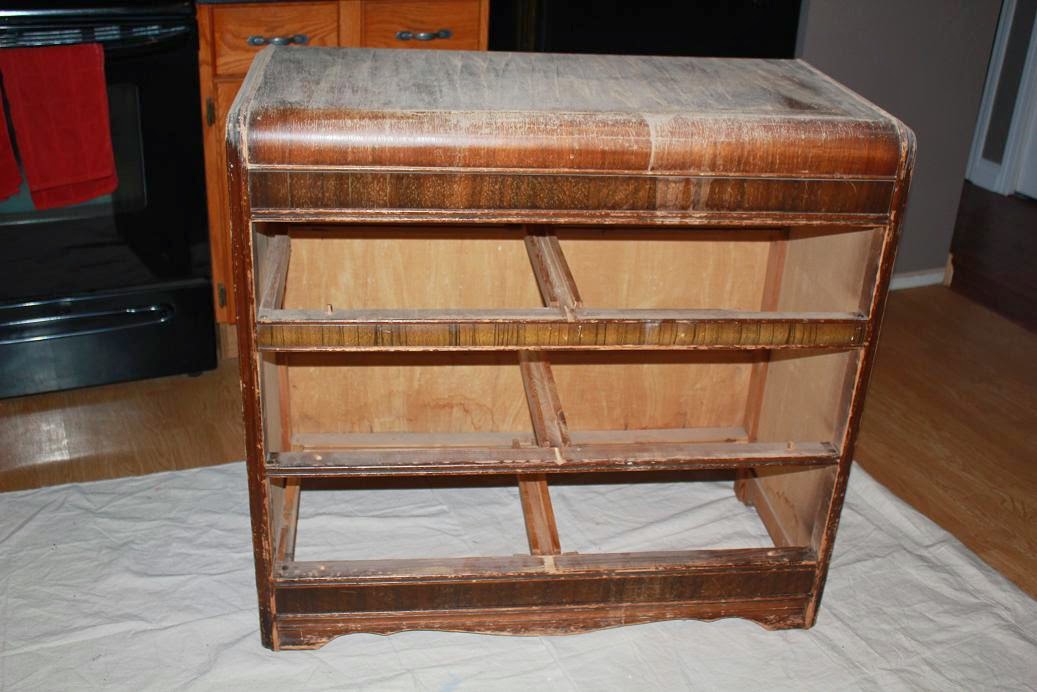
This was how it started out - actually a really really nice armoire. But just wouldn't 'go' with what my customer had in mind for her new look bedroom.


She purchased this bed / headboard
 Modern shape / lines etc - and a completely different finish to what was above.


My brief therefore was to make the armoire 'go' with the bed, with a grey / black finish maybe.

Originally I was going to strip it down, and attempt to bleach the wood and then wash it in a grey /white / brown - but tbh that idea scared the heck out of me. I thought it foolish ultimately to try and replacte this finish because no matter which way you roll the dice, the armoire is traditional and the bed is modern.

 So this one went like this, sand,  a coat of high adhesion Kilz latex primer, 2 coats of latex cabinet in a custom mixed mid grey, then a wash with a dark brown, a wash with a black, some picking out of detailing with some white acrylic on the door / drawer edges, a touch of distressing in the door panels and finally 2 coats of verathane.


I was also requested to line the backs and the insides of the drawers and my customer picked out this lovely paper by blue mountain at Lowes.


Beautiful hey - until I got to the store and you realise it isn't grey at all in the background - it's actually a metallic gold / silver colour :( And seeing as my nearest Lowes that stocks half decent paper is in either Calgary or Edmonton (both of which are a minimum of a 2hr drive away one way,) I had to take the chance and get it.


Luckily it actually worked and my customer loves it :) Here it is lacquered and ready to go


In other news I managed to ditch my new vehicle on Monday, totally my fault - took a corner too quick and ended up stationary, wedged in 2 feet of snow. Clever me hey!

Thank heavens for neighbours / family and tractors!!!!

That unfortunatley lost me a whole honking day of work trying to get towed out and so on, but as with the previous entry and the snow day - it meant I got to finish the armoire above!

I also decided to make a headboard for my bed., apart from I didn't actually make one if that makes sense. I'm one of those "have to do it right now this minute" type of people. So when you see something or have an idea, I scramble around my supplies looking for the necessary ingredients to make it.

So the heaboard called for barn wood, 2x4's and 4x4's. I have a shed load of barnwood. But unfortunately slightly lacking in the 2x and 4x department. So with me still reeling from the ditch incident  - I was rooting around and came across a barnwood mirror that I made a ways back. 

You can't really use it as a mirror because the wood was pretty warped which in turn twists the glass ever so slightly - making it look like on of the fun house mirrors you get at the fairs. So it was stuck in the basement.

I added a shelf and supports and mounted it jut above the bad :) I suppose it'll do for now. But mark my words I WILL go to town and make the headboard (though I'll have to repair the wall that I screwed (leaving a few holes in the process because I couldn't be bothered to get the stud finder out <whistles> ))


I've also gone off the grey colour in the bedroom (been there all of about a year!!!) - I think my husband will legitimately kill me if I paint it again though lol

Well thats what we have right now, I do have another dresser makeover (ordered from the same customer at the same time from the same set of furniture as the armoire - but a different finish)in progress.

This will be the next entry and I'll try and get it in before Xmas.


Wednesday 11 December 2013

Nautical dresser done!

This is just a real quickie - though I will share what I've been doing in my 'full time job" too :)

Finally managed to get the dresser finished


The customer actually came up with the idea of writing "Let your dreams set sail" on the drawer which is really cool :) Apologies for the reflection in the mirror - isn't my kitchen table just the epitome of organisation!!!!

Cool! Well as I've said many times before - I'm a house painter / mural person / cabinet maker overy (overy - that sounds like ovary hmmmmm) person. So currently I'm working on a full interior reno. But I did want to share some kitchen cabinets

Heres the before


No in bad condition, but the colour was old and dated - as were the handles in the centre of them. When I do this kind of work I always give the customer options - ie fastest and cheapest way is to paint them, way to get the best possible finish is to totally strip everything back, and restain / lacquer, more cost effective but still able to see wood grain through is to use a tinted poly. However the finish isn't as perfect as stripping etc and the colours are somewhat limited. Customer went for option 3

Heres how they turned out after 5 coats of stain and 2 coats of poly finish


What a difference stripping off wallpaper and refinishing cabinets makes (I have to wait to paint the kitchen as new counters are going in etc!

Last share post for you all is my Christmas mantel - just cos it's the season :)


Loved the ice skate idea that I saw on a few searches on Google - so blatantly copied it :) Also made the fireplace mantel myself (when I say myself my amazing hubby cut the wood for me!!!!) out of 2x8's - beaten to death with a hammer etc and then stained!!!!!

While I'm at it - here's another Xmas display atop of something else I made


Super easy factory cart coffee table taken from plans here  I LOVE Ana Whites site for making the coolest things for next to nothing!!! Always a bonus in my books!!!!

Hope you enjoyed todays pic fest :)


Monday 2 December 2013

I went on a short holibob!

Yup siree I did! My oldest daughter in the UK gave birth to my first grandson - So I jumped on a plane and went to stay for a while (when I say while I mean week).

I'm not a 'cooey over babies' kind of person but the little fella is pretty darn cute - and so good as well!!!

All my friends wanted tons of updates as to what I got up to over there - but seriously all I was doing was staying with my daughter and her family - so aside from cuddle baby, watching tv and doing some family shopping - that really is it :)

I got back last week to go right back into painting a house interior, which ended up looking fab - it's so nice to see people going away from the greys / browns (which I love by the way) and this one was a relly neat lemony wheat colour! Brightened it up no end. 18 ft vaulted entrance ways certainly have a way of making their mark on your old bones though ;)

Today we have a fabulous winter storm here in central Alberta - so with road warnings left right and centre I had to take a snow day - aside from it wasn't really - because With me also doing furniture (you know - the whole point of the blog!) it means that I get to catch up on some commissions :)

Todays one (which isn't finished yet but I thought I should post piccies cos I've been a bit lapse) was for the same people that bought the very first nautical dresser.

So here's the before (yup I really did take a before!)


It's actually pretty big and I totally was going to keep this, but it fit the bill for what my customer wanted, they also advised on what images they wanted painting onto it too

So here's where we are today


There's still something or other to paint in the little cream drawer above the ship, but my inspiration has ran out for the evening! I also decided not to paint the treasure map across the whole top of the dresser - mainly because if you have furniture with pictures on - it seems a shame to cover them with, well, stuff. So If the sides are left plain at least they can put -um- dresser stuff on it without covering it too much.

Looking at it now I might do a paint effect just to tie in with the map so it isn't so plain on the sides though.

Yup that's what i'll do - but not today, because I'm pooched ;)

Saturday 9 November 2013

The hutch made it home!!!!!!

Yes indeedy it did!!!!

I was at work and had decided not to take my truck seeing as I hadn't heard from the hutch lady, and then lo and behold as soon as I pulled up on site - I got an email giving me the dimensions and saying "see you later!!!!!"- eeeeeeek

I quickly ran outside - flipped all the seats down in the SUV and pulled the front seats as far forward as they'd go - and as luck would have it - it would fit (only just mind you!!!)

Here's the picture from the ad that I saw it from first

Not much to go on but you know when  you get that "I can totally do - um - something with that!!!!

The only problem now was we had a lot of snow at home, and with my husband away and the snow drifts not allowing me to pull up to the deck to unload the hutch. I was stumped.

It sat in the back o the SUV for 2 days. Then finally I got a moment of "right - I'm big and strong surely  can get this into the house" - aside from the fact that I need the vehicle empty for other stuff!!!!

It took about 20 minutes and a lot of choice language to finally haul it through 2ft of snow in some parts and into the house (up some stairs I might add too!)


Drying out in the kitchen on towels!!


I always knew what I was going to do with this - so using that wonderful transfer technique I told you about previously - it now looks like this


The only downside to that technique is that it only really works properly on semi porous / more rough surfaces - so if you use a paint with any kind of sheen, the transferred image will be very faint - meaning you have to painstakingly paint in all the lettering etc with diluted paint.

Looking at it now I still think it needs more distressing - it looks a bit "new" Hmm - I might even antique it some more instead!???

Oh what the heck i'll decide in the morning ;)

It does come with 2 shelves but i only used one for the purpose of the photo, it can also be used as a TV hutch due to the fact that it has 2 circles cut out of the back - however you can't see thees cos they are cunningly disguised with 2 baskets. I love doing that you know - the whole "if you can't see it, it isn't there"!!!

I am now off to bed and will figure out how to hide all the laundry thats piling up :)


Tuesday 5 November 2013

Bored headboard

Remember that awesome birthday 6 hour round trip to collect furniture? Well the dressers are still sat here (i'll get round to doing something with them), but the thorn in my side was the headboard.

I mean, does anyone even have a double bed anymore??? As I'm a waste not want not kinda gal I went to bed the other night with thoughts - what in the blue blazes can I do with that headboard?????

It's about 4.5 feet long - solid wood, no fancy frillies on it. To be honest its a big ol' plank of wood with some 2x2's as legs to attach to a bed.

Hmmmmmm

Plank of wood, plank of wood. What's long - and goes in your house that looks like a big plank of wood (other than a shelf)?????

A COAT RACK!!!!!


A couple coats of Benjamin Moore Advance in the Mayonnaise colour, and I was wondering how to do some nifty wording without spending a ton of money on a Cricut, or a ton of money on varying stencils (I'm kinda cheap like that!)

Well stone the crows - I found this AWESOME tutorial, on how to transfer lettering to wood using just your inkjet printer / water and a paint brush. I kid you not it really is that easy

Here's a link to a great tutorial and a fab blog for instructions on how to do it :) Click Me!

It's so easy even I could do it and not mess it up. But imagine the world off possibilities that opens up for putting lettering on everything, quickly and cheaply - without needing the skills of a master sign-writer!!!!!

That, my friends, is my kinda party!!!!

In other news I'm a bit disappointed that the hutch I was supposed to pick up tomorrow, looks like its not coming home with me. The online seller has all of a sudden gone quiet since me asking for an address (paramount for actually getting somewhere) a couple days ago.

Oh well.

I suppose I have other furniture here to be going on with. But I was sooooo excited about this hutch and what it was going to be :(


Sunday 3 November 2013

Shabby Chic - urrrghhhhhhhhhhhh

Lol

Theres buzz words and phrases that really yank my chain. 'Stainless steel appliances and granite countertops' for some reason riles the hell out of me. As does 'Pop of colour'. And the latest is 'shabby chic'. I don't know why - they just do.

So when I decided refinish this awesome console table and matching side table (the latter of which is still wet on my kitchen floor as we speak - i'll edit this post and put pics of it up to), I totally went for the traditional off white, aged / distressed shabby chic  look that I actually really love (ooh oooh picking up a display hutch type thing that I have an AMOOZING idea to turn into a hallway storage coat hanging shoe area - but I don't pick it up til Wednesday so i'll leave it here for now!!!)

And guess who did the thing with the thing of not taking before pics (this is getting old yeah :( )

Anyway it looked a bit like this


Apart from not as well staged, and with maybe some of my washing baskets on top of it - and random tools etc while it sat around waiting for it's paint job.

It's weird, with some bits of furniture (I try not to call them 'pieces' thats another word that grinds on me lol) you know instantly as soon as you clap eyes on them - what you are going to do, so without further ado - here's what I did


I really really really wanted to keep this (and its matching table) but I just don't have the room. And the same will apply to the storage unit too.

Maybe I can get hubby to build me a big storage type staging housey type area, and I can refinish all these bits and bobs (see how the word pieces wasn't used ;) ) and just keep them forever and ever - like an old mad furniture collecting English woman.

Or maybe not!


Thursday 31 October 2013

Little girls dresser

A couple weeks back I was asked to 'do' a dresser for a 3 year old girl.

So armed with that info, and the fact that she is referred to as a princess (and what little girl doesn't like to be called a princess!) I was immediately on the lookout for a 3 year old suitable dresser.

Thats easier said than done! I also went searching for vanities just in case but old mother hubbards cupboards were looking a tad sparse :(

Luckily someone contacted me and said they had a dresser they were getting rid of, sent me pics and I was relieved. Well sort of. It was a dresser, with 3 drawers (so shorter than the standard ones) - awesome. But the shape was a bit - well - in need of love!


See what I mean 

However some severe sanding and priming - turned it from this


Into a dresser fit for a princess


How dya like those crowns on the front? Aren't they cute :) Actually they are balsa wood photo frames (the type you can buy at Walmart / Dollar store etc,) I just removed the hardware from the back and glued them on! And another cool little trick to get the painted graphic on top, is the old "Mod Podge Transfer" technique.

Basically you print out a picture (it's supposed to be on a laser printer, but my normal one worked fine) and let the ink dry. Cut out the picture and put a coat of Mod Podge on the picture side and stick it face down.

You're supposed to let it dry for 24 hours, but I left mine for like 3, impatient minnie that I am! Then you get a damp sponge and start wetting the reverse of the paper  - it pulls the paper off but the print and Mod Podge remain like a transfer on the furniture. I then painted it in and hey presto!!!

If you are going to try this heres a better video, granted they have done this on fabric (which is waaaay cool anyway) but it can be done on pretty much anything :) I'm now off to find other things I can transfer things to!


Sunday 27 October 2013

Take one old sewing machine from the dump .........................

Awww doesn't it look all sad and so on (and dirty too!)


But holy smokes look at that beautiful sewing machine in there!!! How could anyone dump this :(


And the drawers were kind of - well actually the were - falling apart


And the less said about the veneer on the front the better!

Now I'm not by any means a carpenter. If Bob the Builder were to come a knocking and say "can you fix it?" I'd probably say "Um no, but I can paint it if that would help????"

So originally it was patched together, gaps in the veneer filled and the whole base painted in cream. But the bubbling in the veneer stood out like a sore thumb. So now it cam to doing a nifty paint technique called "oh cr@p I now have to make this front but look like wood"


I think it turned out OK!!!!


The front sign was painted to match the patina of the original handles that were still on the drawers!


I also attempted to stage this one for the photo using seasonal pumpkins and so on!!!!


While wire brushing the base ready for spraying I noticed the lettering was originally picked out in gold. So as luck would have it - I have gold to hand - so back to original went the base!


Who doesn't like a rear end shot!


And thats it. It's only going to be used for display purposes (which is good due to my carpentry skills ;) ) but the lady who this is for absolutely loves it. I hope you do too :)


Tuesday 22 October 2013

I'm running out of nautical things to say :(

It was my birthday at the weekend! And after finishing an interior repaint of a lovely ladies house on Thursday, I was right back to the furniture finding / painting.

So Friday saw me out and about on the lookout for more bits and pieces. I found the two pieces used on the makeover below SCORE - and also a set (6 drawer long dresser  with mirror / 5 drawer tall dresser and a double headboard) about a 3 hr drive away for a steal of a deal. So I called the guy up and spent my Saturday birthday morning on a furniture run! Yay happy birthday hey!!!

The ship / sea themed dressers are going down a storm. I promised a customer a while back that if I did anymore, she would get first refusal on them. So when I picked up the mid century modern dresser and the little side table (from different places) I thought I'd do a set.


You know I'm really beginning to fall in love with this style of furniture, almost seems a shame to paint it.

Almost!


Yes yes I know the before isn't the same as the after, but I did it again with the whole "being too excited to take a before picture" but it really is what it looked like (with a few more scratches and felt pen on it!)


Luckily the lady that expressed an interest in the nautical stuff that I called and sent pictures to, loved it - so I didn't even have to advertise it for sale!!!! 

So now while I'm pondering on what to do with the 'set', the owner of the house I painted, asked me if I would redo an old sewing machine table that her son in law had found at the local dump??!!!!!!!

Sure, says I, I can paint anything! - it's not in great shape, and she's fully aware of that - however the person who dumped it - also dumped all of the bits that had fallen off! (backs of drawers / handles etc) with it. Makes me sad people would throw something like this away! So at least there's bits to put back together

Well when I say 'this' you can't see it yet - it's still in my truck! I'll start it tomorrow. It's going to be refinished purely for decorative purposes and I hope I can do it justice :)


Friday 18 October 2013

I must have a thing for stars and flags!

Remember a couple entries ago, I told you that my luvverly mum in law had donated a coffee / side table set?

Well in between painting the interior of a house this week, I managed to refinish them too! Don't panic too much, my hubby works away a lot, so I have't chosen furniture over him - moreso that it keeps me occupied of an evening!!!

Now unfortunately I didn't take any before pictures :( like the idiot I am - however when I was hunting around the interworldweb for inspiration on what the heck to do with glass topped / inserts coffee tables, I found a blog by a lady that had the exact same set and had posted her makeover.

So you can click here to see the pics of how my tables were before (and also it's great to see 2 sets of tables with 2 completely different makeovers!)

 And here's how mine turned out!!!


Close up on the table tops! This, believe it or not really is the glass inserts still in them! I sprayed them with Rustoleums Universal spray - which adheres to glass. Then primed with an oil primer with a brush to get the stroke marks in it! Top coated with an off white of Benjamin Moore advance, and then added the faux wood / star / grain effect using acrylic craft paint. Last step was to top coat with 2 coats of urethane!


 I also decided to add a little barbed wire detail to the front - you know - just cos!!!!!

I really really love them :)


Another flag??!!! Really

Yup - another flag!

In the interests of balancing out the continental divide - I thought I would pay homage to my adopted home country - and more specifically the province  live in!!!!

Well with those clues it's not tough to figure out what's coming eh!

So here's the before (unsurprisingly!) When friends get to hear that you 'makeover' furniture they tend to see you as a great place to offload all of their unwanteds! This was an unwanted that I definitely wanted!
 Et voila!!!! I don't know what made me paint it in the airforce blue? Maybe cos when I looked at it, it seemed a 'masculine' shape. And blue's for buys right?!
Another view!
Close up of the Alberta flag on top. this was my first try at 'painting' (I mean masking off shapes!!!) with various stain I love how this turned out I really do